Build a Cold Frame: 3-Season Growing with Recycled Materials
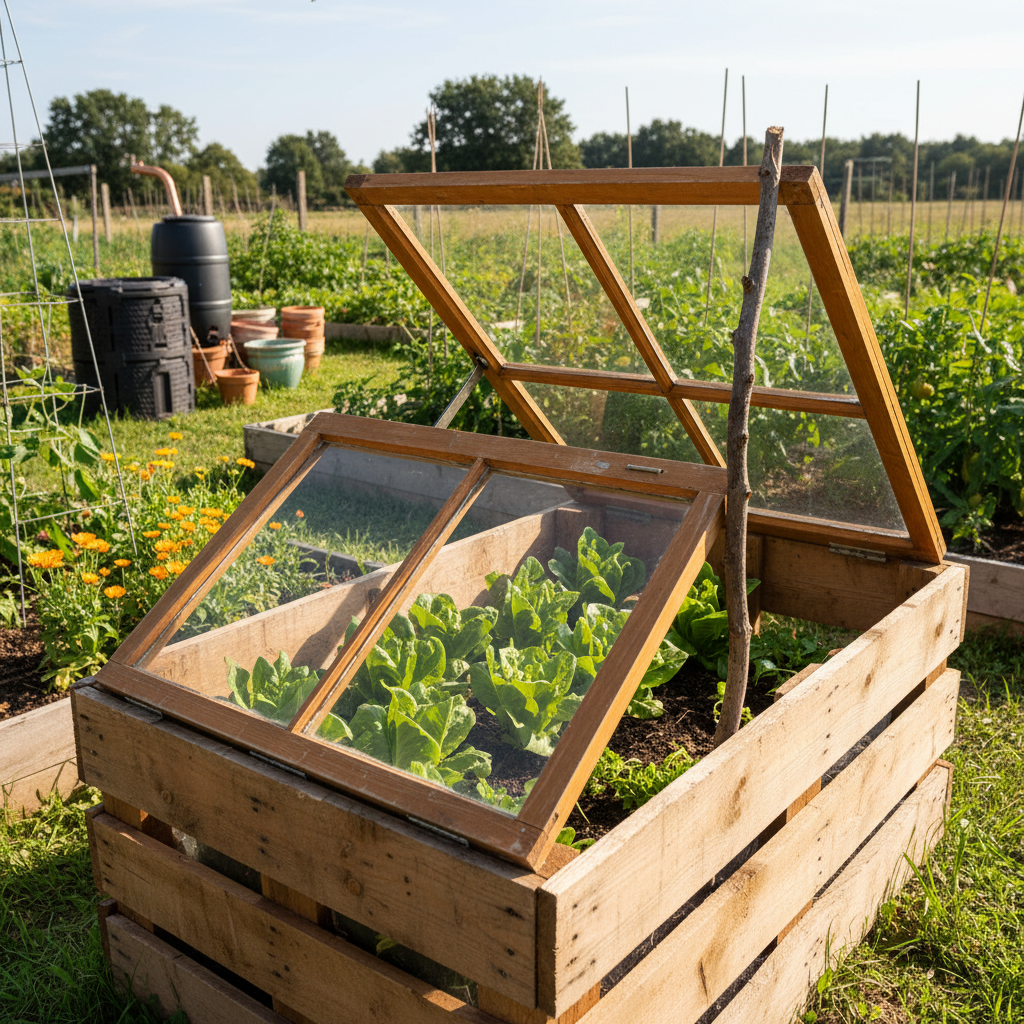
Building a cold frame is one of the most rewarding projects for extending your growing season. Using recycled materials like old windows and scrap wood, you can create an effective season extender that keeps your plants productive well into fall and gets them started earlier in spring. This sustainable approach not only saves money but also gives new life to materials that might otherwise end up in landfills.
A cold frame acts as a passive solar greenhouse, capturing heat during the day and releasing it slowly at night. With proper construction and placement, your cold frame can protect plants from frost while maintaining ideal growing conditions for cool-season crops.
Why Choose a Cold Frame for Season Extension?
Cold frames offer several advantages over other season extension methods. They’re simple to build, require no electricity, and provide excellent protection from wind, frost, and harsh weather. Unlike heated greenhouses, they work with natural temperature fluctuations to gradually acclimate plants to changing seasons.
Moreover, cold frames are perfect for hardening off seedlings before transplanting them into your main garden. They create a controlled environment that bridges the gap between indoor growing and outdoor conditions.
Benefits of Using Recycled Materials
Using recycled materials for your cold frame project serves multiple purposes. First, it significantly reduces costs compared to buying new materials. Second, it keeps usable items out of waste streams, supporting your sustainable gardening practices.
Old windows are particularly valuable because they already have the glazing you need. Scrap wood provides the structure, and with proper treatment, can last for many years. This approach aligns perfectly with permaculture principles of reducing waste and maximizing resource efficiency.
Essential Materials for Your Cold Frame Build
Before starting construction, gather these essential materials. Most can be sourced from renovation projects, construction sites, or online marketplaces.
Primary Materials List
For the frame:
- 4-6 pieces of 2×8 or 2×10 lumber (length depends on your desired size)
- 1 old window or storm door for the lid
- Hinges and hardware for lid attachment
- Wood screws and construction adhesive
- Weather stripping for better sealing
Optional additions:
- Insulation materials (straw, bubble wrap, or rigid foam)
- Automatic vent openers for temperature control
- Corner brackets for extra stability
Where to Source Recycled Materials
Finding quality recycled materials requires some detective work, but the savings are worth it. Check these sources regularly:
Windows: Renovation companies, Habitat for Humanity ReStore locations, and online classifieds are excellent sources. Look for windows with intact glass and functional frames. Single-pane windows work best as they’re lighter and easier to handle.
Lumber: Construction sites often have usable scraps, though always ask permission first. Demolition projects, deck replacements, and fence removals generate suitable wood pieces.
Step-by-Step Cold Frame Construction
Building your cold frame involves creating a slanted box that maximizes sun exposure while providing wind protection. The key is ensuring proper drainage and ventilation while maintaining structural integrity.
Planning Your Dimensions
Start by determining your cold frame size based on available space and intended use. A typical beginner-friendly size is 3 feet by 4 feet, which accommodates most standard windows while remaining manageable to build and maintain.
The frame should slope from back to front, with the back typically 16-18 inches high and the front 8-10 inches high. This slope ensures maximum sun exposure and proper water runoff.
Cutting and Preparing Materials
Measure and cut your lumber to create the four sides of your frame. The angled cuts on the side pieces are crucial for achieving the proper slope. Use a circular saw or miter saw for clean, accurate cuts.
Sand all surfaces lightly to prevent splinters and improve paint adhesion. If using reclaimed lumber, inspect carefully for nails or other hardware that could damage tools or cause injury.
Assembly Process
Begin assembly by connecting the front and back panels to the side pieces. Use wood screws and construction adhesive for maximum strength. Pre-drill holes to prevent splitting, especially near board ends.
Next, attach the hinges to both the frame and window. Position hinges so the window opens away from prevailing winds. This prevents sudden gusts from slamming the lid shut or damaging the hinges.
Install weather stripping around the frame perimeter to improve insulation. This small detail significantly improves temperature retention during cold nights.
Strategic Placement for Maximum Effectiveness
Proper placement is crucial for cold frame success. The ideal location receives full morning sun and is protected from harsh winds. South-facing slopes work exceptionally well, as they maximize solar gain throughout the day.
Consider your garden’s microclimate patterns when choosing placement. Areas that warm up quickly in morning and stay warm longest in evening provide the best growing conditions.
Site Preparation
Level the ground where your cold frame will sit. Proper drainage is essential to prevent waterlogged soil and root rot. If your site doesn’t drain well naturally, consider adding a layer of gravel or creating a slightly raised bed.
Ensure easy access for daily monitoring and harvesting. Cold frames require regular attention, especially during temperature swings when venting becomes critical.
Seasonal Positioning Considerations
While permanent placement works well, consider making your cold frame portable. This flexibility allows you to move it to different garden areas as seasons change or crops rotate.
In summer, partial shade prevents overheating. During winter, maximum sun exposure becomes the priority. Understanding these seasonal needs helps you get the most from your investment.
Maximizing Your Cold Frame’s Potential
Once constructed and placed, your cold frame can support year-round growing activities. Spring use focuses on starting seeds early and hardening off transplants. Summer might involve protecting heat-sensitive crops or providing controlled growing conditions for specific plants.
Fall and winter use extends the harvest season significantly. Cool-season crops like lettuce, spinach, kale, and radishes can continue producing well past their normal outdoor season. This extended harvest period can significantly impact your food security and grocery budget.
Crop Selection for Three-Season Growing
Choose crops that match each season’s conditions. Spring favorites include lettuce, spinach, and cool-season herbs. Summer use might focus on starting fall crops or protecting tender plants during heat waves.
Fall and winter crops should be cold-hardy varieties that can tolerate some freezing. Many Asian greens, winter radishes, and cold-hardy herbs thrive in cold frame conditions. Complement your cold frame growing with proper microclimate-aware planting strategies for best results.
Maintenance and Care Tips
Regular maintenance keeps your cold frame functioning optimally. Check hinges and weather stripping seasonally. Replace any damaged glazing promptly to maintain insulation.
Monitor soil conditions regularly. Cold frames can dry out quickly during sunny periods but may stay too wet during extended cloudy weather. Adjust watering accordingly and ensure proper drainage continues working effectively.
Troubleshooting Common Cold Frame Issues
Even well-built cold frames can develop problems over time. Temperature regulation challenges often arise during seasonal transitions when day and night temperatures vary dramatically.
Overheating is the most common issue, especially during sunny spring days. Install automatic vent openers to prevent cooking your plants. These simple devices open the lid automatically when temperatures rise above set points.
Condensation problems indicate poor ventilation or excessive moisture. Improve air circulation and consider adding ventilation holes near the bottom of the frame.
Winter Protection Strategies
During extreme cold snaps, additional protection may be necessary. Cover the cold frame with old blankets or tarps during the coldest nights. Remove covers promptly when temperatures rise to prevent overheating.
Snow can actually provide additional insulation, so don’t rush to remove it unless it’s blocking all light. However, clear heavy snow loads that might damage the glazing or frame structure.
Building a cold frame with recycled materials represents an excellent introduction to sustainable garden infrastructure. This project combines practical construction skills with environmental stewardship while delivering tangible growing benefits. As you gain experience with your cold frame, consider expanding your sustainable gardening toolkit with other season-extending tools and techniques.
Your recycled cold frame will serve you for many seasons, providing fresh produce when grocery store options are limited and expensive. More importantly, it connects you more deeply with natural growing cycles while demonstrating how sustainable practices can enhance rather than complicate your gardening journey.