Build a Cold Frame with Recycled Materials for 3-Season Growing
Building a cold frame recycled structure opens up incredible possibilities for extending your growing season without breaking the bank. This sustainable approach to season extension combines eco-friendly practices with practical gardening solutions that any homeowner can tackle.
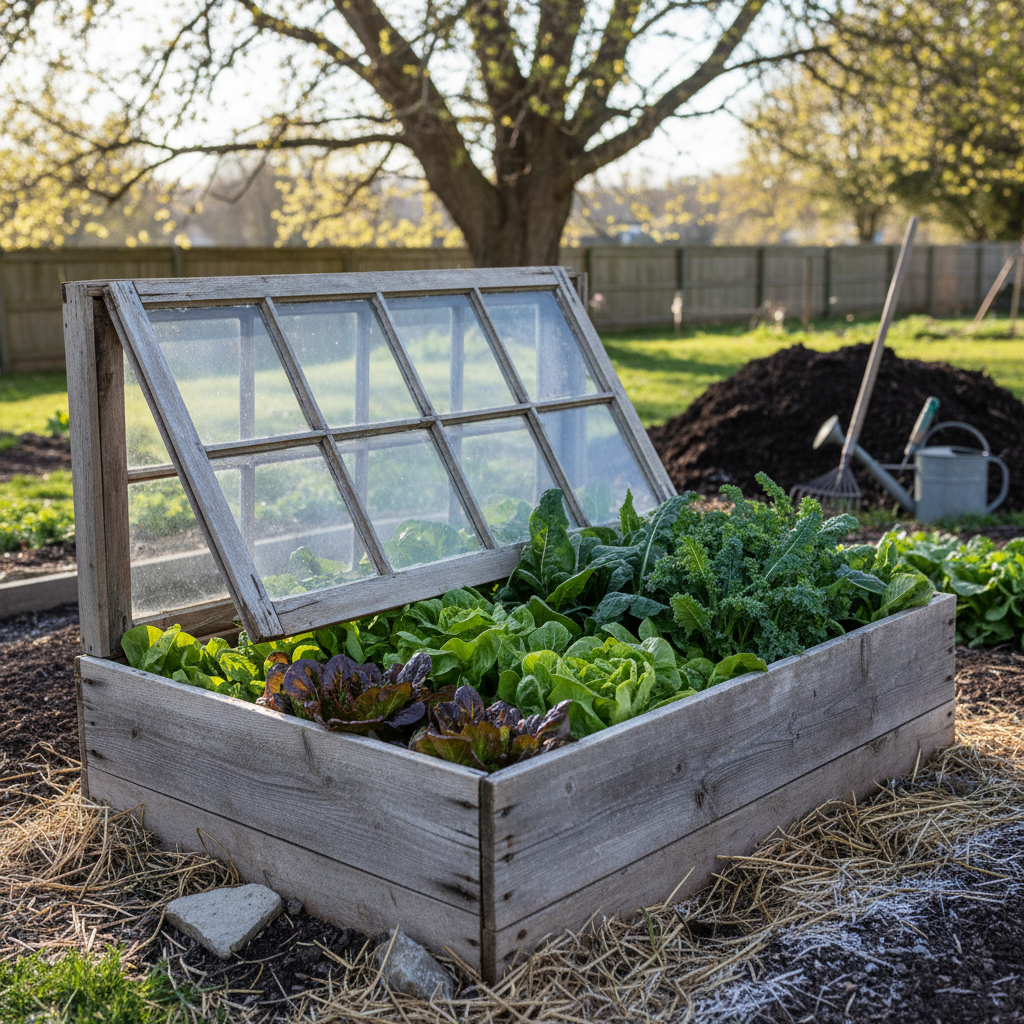
A cold frame acts like a mini greenhouse, capturing and holding solar energy to create a protected microclimate for your plants. Moreover, using recycled materials makes this project both budget-friendly and environmentally responsible.
Why Choose a Cold Frame Recycled Approach?
Using recycled materials for your cold frame offers multiple benefits beyond cost savings. First, you’re diverting waste from landfills while creating something useful for your garden. Additionally, older windows often have better insulating properties than modern thin glass.
Reclaimed wood typically comes pre-weathered, meaning it’s already adapted to outdoor conditions. Furthermore, this approach aligns perfectly with permaculture principles of working with what’s available rather than always buying new.
Most importantly, a well-built recycled cold frame can last for decades with minimal maintenance. This makes it an excellent investment in your garden’s long-term productivity.
Sourcing Your Cold Frame Recycled Materials
Finding the right materials is half the fun of this project. Start by checking local construction salvage yards, where old windows are often available at reasonable prices. Many homeowners also sell windows during renovation projects through online marketplaces.
For the frame itself, look for cedar, pine, or other rot-resistant wood scraps. Pallet wood works well too, though you’ll need to ensure it’s heat-treated rather than chemically treated. Check the stamps on pallets – look for “HT” marking.
Don’t overlook Habitat for Humanity ReStores, garage sales, and even your own basement or garage. Sometimes the perfect materials are closer than you think.
When selecting windows, prioritize functionality over appearance. Small cracks or missing putty can be easily repaired, but ensure the frame itself is solid.
Essential Tools and Hardware
Beyond your recycled materials, you’ll need basic carpentry tools. A drill, circular saw, and measuring tape are essential. Additionally, gather wood screws, hinges, and weather stripping.
For assembly, have wood glue, exterior wood stain or paint, and a level on hand. These items ensure your cold frame recycled project turns out professional-looking and durable.
Step-by-Step Construction Guide
Start by measuring your window to determine frame dimensions. The back wall should be 6-8 inches taller than the front, creating the essential sloped roof for maximum sun exposure and rain runoff.
Cut your side pieces with angled tops to match this slope. Next, assemble the frame using wood screws and glue at all joints. Pre-drill holes to prevent splitting, especially with reclaimed wood.
Attach the hinges to your window and the back edge of the frame. This allows easy access for planting, weeding, and harvesting. Install a chain or rope to limit how far the window opens.
Consider adding weather stripping around the window perimeter for better insulation. This small detail significantly improves temperature retention during cold snaps.
Finishing Touches for Longevity
Apply exterior wood stain or paint to protect against weather damage. Choose earth tones that blend naturally with your garden landscape. Additionally, ensure proper drainage by slightly elevating the back of the frame.
Install a simple thermometer inside to monitor temperatures. This helps you understand when to open or close the frame for optimal plant health.
Strategic Placement for Maximum Effectiveness
Location determines your cold frame’s success more than any other factor. Choose a south-facing spot that receives full morning sun and is protected from harsh north winds. Understanding your garden’s microclimates is crucial for optimal placement.
Avoid low-lying areas where cold air settles. Instead, position your frame on slightly elevated, well-drained ground. This prevents waterlogging and improves thermal performance.
Consider proximity to your house for easy access during winter months. You’ll appreciate this convenience when checking plants during harsh weather or harvesting fresh greens for dinner.
Furthermore, think about expansion possibilities. Leave room to add additional frames as your confidence and success grow with your gardening skills.
Soil Preparation Inside Your Frame
Good soil is essential for cold frame success. Remove existing turf and dig down 6-8 inches, then backfill with high-quality compost and garden soil mixture. This soil preparation creates the foundation for healthy plant growth.
Add a 2-inch layer of mulch to retain moisture and regulate soil temperature. This creates more stable growing conditions throughout temperature fluctuations.
What to Grow in Your Cold Frame Throughout the Seasons
Spring offers exciting possibilities for early seed starting. Begin lettuce, spinach, and radishes 4-6 weeks before your last frost date. These cool-season crops thrive in the protected environment.
Summer use focuses on heat-sensitive crops like cilantro and lettuce that typically bolt in high temperatures. The frame provides afternoon shade while maintaining morning warmth.
Fall and winter are where your cold frame recycled really shines. Grow hardy vegetables like kale, Brussels sprouts, and winter lettuce varieties throughout the coldest months.
Consider succession planting every 2-3 weeks for continuous harvests. This strategy, combined with proper seasonal planning, maximizes your cold frame investment.
Temperature Management Tips
Monitor internal temperatures daily during extreme weather. Open the frame when temperatures exceed 75°F to prevent overheating. Conversely, add extra insulation during particularly cold snaps.
Old blankets or row covers provide additional protection during the coldest nights. Remove these coverings once temperatures moderate to prevent overheating.
Maintenance and Seasonal Care
Regular maintenance keeps your cold frame productive for many years. Clean the glass monthly to maximize light penetration. Additionally, check hinges and weather stripping annually, replacing as needed.
Inspect the wood frame each spring for signs of rot or pest damage. Address issues promptly to prevent costly repairs later. A well-maintained recycled cold frame often outlasts expensive commercial versions.
During off-seasons, prop the window open for air circulation. This prevents condensation buildup and extends the life of both the window and frame.
Troubleshooting Common Issues
If plants appear leggy, they’re likely not receiving enough light. Clean the glass and consider the frame’s orientation. Sometimes, minor adjustments make significant differences.
Conversely, if seedlings are burning or bolting prematurely, the frame may be getting too hot. Increase ventilation or add temporary shading during peak summer months.
Expanding Your Cold Frame System
Once you experience success with your first cold frame recycled structure, expansion becomes irresistible. Build additional frames for different crops or create specialized units for seed starting versus overwintering.
Consider connecting multiple frames for a mini greenhouse effect. This creates even more stable growing conditions and allows for larger plantings.
Document your experiences in a garden journal to track what works best in your specific climate and conditions.
Your recycled cold frame represents more than just a gardening project – it’s a step toward greater self-sufficiency and environmental stewardship. With proper construction and placement, this simple structure will provide fresh, homegrown vegetables throughout most of the year while keeping useful materials out of landfills.