Sheet Mulching: Transform Lawn Into Garden Beds Fast
Tired of back-breaking digging and harsh chemicals just to create new garden beds? Sheet mulching offers a brilliant solution that transforms grass into rich, productive soil without the pain. This no-till method harnesses nature’s own decomposition process to build garden beds that actually improve over time.
Whether you’re a complete beginner or looking to expand your growing space sustainably, sheet mulching lets you skip the shovel and embrace a gentler approach to garden creation.
What is Sheet Mulching and Why Does It Work?
Sheet mulching, also called lasagna gardening, is a permaculture technique that builds new garden beds by layering organic materials directly over existing grass or weeds. Think of it as creating a giant compost pile right where you want your garden to grow.
The magic happens through a simple process: cardboard smothers the grass while organic layers above feed beneficial microorganisms. These tiny soil workers break down the materials, creating rich humus that plants absolutely love.
Unlike traditional methods, this approach actually improves soil structure and water retention. You’re not just removing grass – you’re building an entire ecosystem that supports plant health for years to come.
Essential Materials for Successful Sheet Mulching
Gathering the right materials makes all the difference in your sheet mulching success. Start with large pieces of cardboard – moving boxes work perfectly. Remove all tape and staples, as these won’t decompose.
For your organic layers, you’ll need both ‘brown’ and ‘green’ materials. Browns include dried leaves, straw, shredded newspaper, and wood chips. Greens encompass kitchen scraps, fresh grass clippings, and nitrogen-rich manures.
Don’t forget a good water source nearby. You’ll need to thoroughly soak each layer as you build, ensuring proper decomposition from the start.
Layer Ratios That Actually Work
Aim for roughly three parts brown materials to one part green materials. This carbon-to-nitrogen ratio feeds soil microbes effectively without creating smelly, anaerobic conditions that can harm plant roots.
Most successful sheet mulch beds end up 12-18 inches tall initially. Don’t worry – this settles dramatically as decomposition progresses, usually shrinking to about 6 inches within the first year.
Step-by-Step Sheet Mulching Process
Start by marking your new bed boundaries with spray paint or flour. There’s no need to mow the grass first – longer grass actually helps trap moisture and creates air pockets for better decomposition.
Lay cardboard pieces directly over the grass, overlapping edges by 6-8 inches to prevent grass from sneaking through gaps. Water the cardboard thoroughly until it feels soggy and pliable.
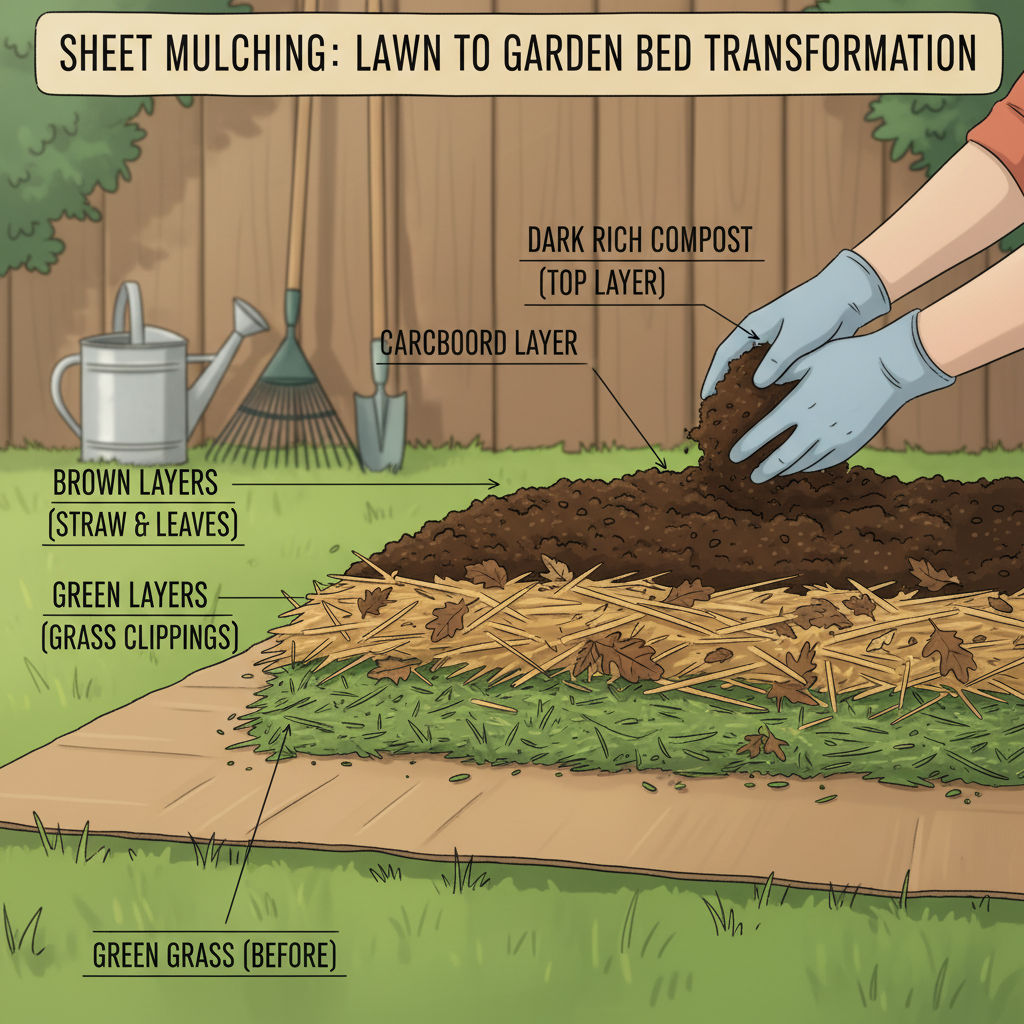
Now begins the layering process that makes sheet mulching so effective:
Layer 1: Spread a thin layer of nitrogen-rich materials like fresh grass clippings or composted manure. Water lightly.
Layer 2: Add brown materials such as dried leaves or straw, creating a layer about 4-6 inches thick. Water thoroughly.
Layer 3: Alternate green and brown layers, watering each one until you’ve built your desired height.
Final Layer: Top with 2-3 inches of finished compost or quality topsoil for immediate planting capability.
Timing Your Sheet Mulching Project
Fall offers the ideal window for sheet mulching projects. Materials are abundant, and winter gives your bed time to decompose before spring planting season arrives.
However, you can start sheet mulching any time of year. Spring installations work well if you plan to plant immediately in the top soil layer while lower layers continue decomposing.
Planting in Your New Sheet Mulch Beds
You can plant immediately in fresh sheet mulch beds, but your approach matters. For direct seeding, pull back mulch layers to expose the top soil layer, then reseed after seedlings establish.
Transplants work wonderfully in new beds. Simply dig holes through the mulch layers down to the cardboard, then plant as usual. The cardboard will decompose around developing root systems.
Larger plants like tomatoes and peppers often perform exceptionally well since sheet mulch beds provide excellent moisture retention and steady nutrient release as materials break down.
If you’re new to sustainable growing methods, consider starting with our four-week beginner garden plan to build confidence alongside your sheet mulch beds.
Troubleshooting Common Sheet Mulching Challenges
Grass poking through indicates inadequate cardboard coverage. Simply add more cardboard pieces over problem areas, ensuring proper overlap. This happens more frequently with persistent grasses like Bermuda.
Slow decomposition usually means your pile needs more nitrogen or water. Add fresh grass clippings or diluted liquid fertilizer, then water thoroughly. Properly balanced sheet mulch should show significant settling within 2-3 months.
Pest issues sometimes arise if you include diseased plant materials or fresh kitchen scraps. Stick to finished compost for green layers, and avoid adding meat, dairy, or oily foods that attract unwanted visitors.
When Sheet Mulching Isn’t the Best Choice
Extremely compacted clay soils may need additional preparation before sheet mulching works effectively. Consider broadforking or adding coarse materials like wood chips to improve drainage first.
Areas with serious drainage issues require addressing underlying problems before building sheet mulch beds. Poor drainage can create anaerobic conditions that harm plant roots and create unpleasant odors.
Long-term Benefits and Maintenance
Well-established sheet mulch beds require minimal maintenance while providing outstanding growing conditions. The initial investment in materials and time pays dividends for years through reduced watering, weeding, and fertilizing needs.
Soil structure continues improving as earthworms and beneficial microorganisms colonize your beds. Many gardeners report noticeably healthier plants and improved yields compared to traditional garden beds.
To maintain your beds, simply add fresh organic materials annually. This mimics natural forest floor processes and keeps your soil biology thriving.
For ongoing garden success, understanding your specific growing conditions becomes crucial. Our guide to reading and improving your soil helps you make informed decisions about amendments and plant selection.
Scaling Your Sheet Mulching Success
Start small with your first sheet mulching project. A 4×8-foot bed teaches you the process without overwhelming your time or budget. Success with smaller areas builds confidence for larger transformations.
Many gardeners find sheet mulching becomes addictive once they see the results. The method scales beautifully from small herb gardens to entire landscape transformations.
Consider documenting your progress with photos and notes. This helps you refine your technique and provides valuable data for future projects. Our garden journaling templates make tracking easy and productive.
Sheet mulching represents permaculture principles in action – working with natural processes rather than against them. This method builds soil health while creating productive growing spaces that support both plants and beneficial organisms.
Your lawn-to-garden transformation doesn’t require expensive equipment or harsh chemicals. With cardboard, organic materials, and patience, you’ll create thriving garden beds that improve with each passing season.
Ready to start your sheet mulching journey? Gather your materials, choose your location, and begin building the foundation for years of sustainable gardening success.