Rain Catchment 101: DIY Water Systems for Your Garden
Building your own rain catchment system is one of the most rewarding steps you can take toward sustainable gardening. Whether you’re dealing with rising water costs or simply want to reduce your environmental impact, collecting rainwater transforms every storm into an opportunity to nurture your plants naturally.
This comprehensive guide will walk you through everything you need to know about creating effective rain catchment systems for your garden, from basic barrel setups to more advanced collection methods.
Why Rain Catchment Makes Perfect Sense
Rainwater is naturally soft, free of chlorine, and at the perfect pH for most plants. Unlike tap water, it doesn’t contain the chemicals that can build up in soil over time. Plus, collecting rainwater reduces stormwater runoff, which helps prevent erosion and reduces the burden on municipal drainage systems.
For home gardeners, rain catchment offers immediate benefits:
- Lower water bills
- Better plant health
- Reduced dependency on municipal water
- Emergency water backup during dry spells
Before you begin, however, it’s crucial to understand the legal landscape around rainwater collection in your area.
Legal Considerations: Know Before You Collect
While most areas allow residential rainwater collection, some regions have specific regulations. Generally, collecting rainwater from your own roof for garden use is perfectly legal and encouraged. However, some states have restrictions on large-scale collection or specific requirements for system design.
Before installing your rain catchment system, check with your local water authority or municipal office. Most residential systems fall well below any regulatory thresholds, but it’s always better to verify first.
Additionally, if you live in a homeowners association (HOA), review your covenants to ensure your rain barrel placement complies with aesthetic guidelines.
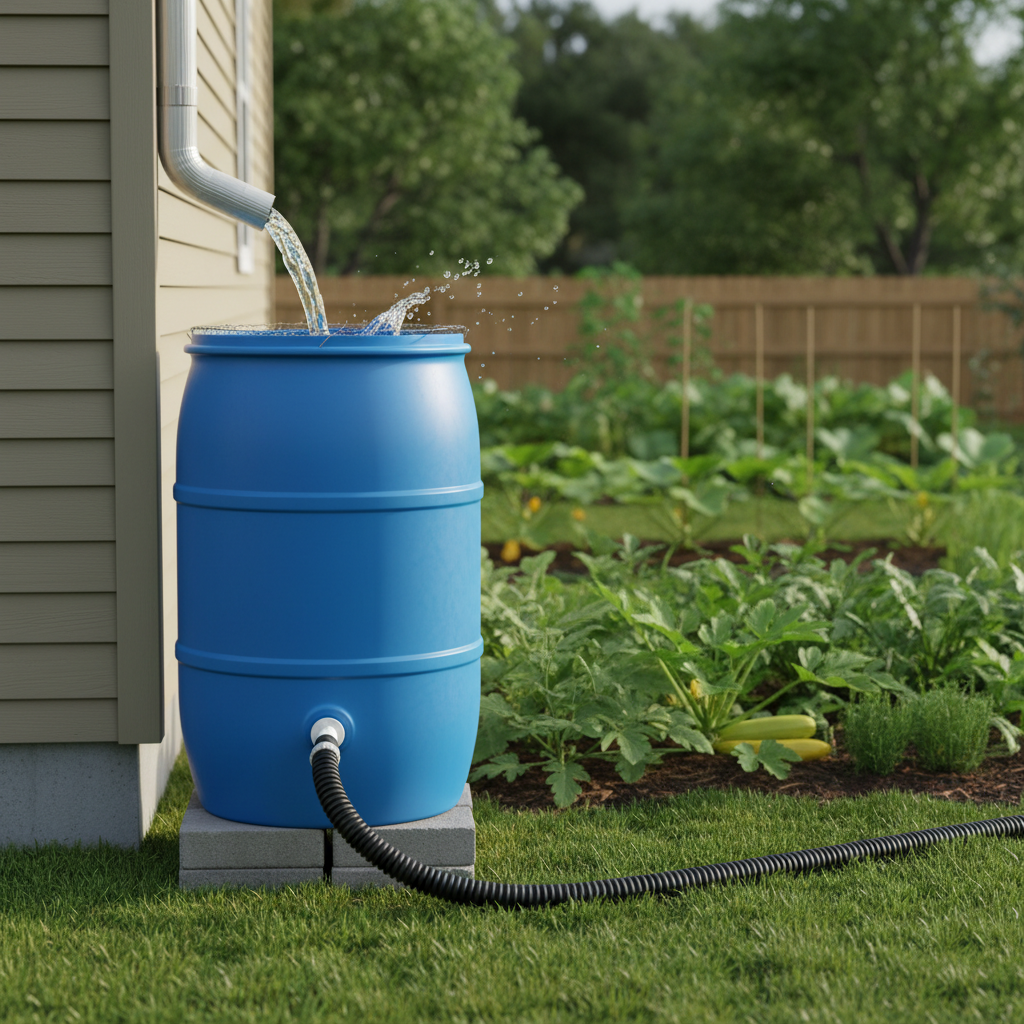
Essential Materials for Your DIY Rain Catchment System
The beauty of rainwater collection lies in its simplicity. You can create an effective system with just a few basic materials:
For a basic barrel system:
- 55-gallon food-grade barrel or commercial rain barrel
- Spigot or valve for water access
- Screen or mesh for debris filtering
- Downspout diverter kit
- Flexible tubing or PVC pipe
- Concrete blocks or wooden platform for elevation
For enhanced systems:
- Multiple barrels for increased capacity
- First-flush diverter
- Overflow valve
- Mosquito dunks for biological control
Most materials are available at hardware stores, and many communities offer rain barrel workshops or discounted barrels through environmental programs.
Step-by-Step Setup Guide
Setting up your rain catchment system is straightforward when you break it down into manageable steps. Start by choosing the right location near a downspout with good access to your garden areas.
Step 1: Prepare Your Collection Area
Select a level spot within 10-15 feet of your target downspout. Ensure the location allows gravity flow to your garden beds. If needed, create a stable platform using concrete blocks or treated lumber to elevate your barrel 12-18 inches off the ground.
Step 2: Install the Barrel
Drill a hole near the bottom of your barrel for the spigot, following manufacturer instructions. Install the spigot with appropriate gaskets to prevent leaks. Near the top, cut an opening for water inlet and cover with fine mesh to keep debris and insects out.
Step 3: Connect to Your Downspout
Install a downspout diverter according to package directions. This device redirects water from your gutter system into your barrel while allowing overflow to continue through the original downspout path. Connect flexible tubing from the diverter to your barrel’s inlet.
Step 4: Add Overflow Protection
Install an overflow valve near the top of your barrel to prevent overflowing during heavy rains. Direct overflow water away from your home’s foundation using additional tubing or by positioning the barrel where overflow won’t cause problems.
This systematic approach, similar to the structured learning methods outlined in our 8-week garden skill ladder, builds confidence through manageable steps.
Advanced Rain Catchment Techniques
Once you’ve mastered basic collection, consider expanding your system for greater capacity and efficiency. Multiple barrel systems can store hundreds of gallons, providing substantial water security during dry periods.
Linking Multiple Barrels
Connect barrels using bulkhead fittings near the top of each container. This creates a system where water fills the first barrel completely before flowing to the second, maximizing storage while maintaining consistent water pressure.
First-Flush Diverters
These devices automatically discard the first gallon or two of runoff from each rainfall, removing dust, pollen, and debris that accumulate on your roof between storms. The cleaner water that follows is then directed to your storage barrels.
Gravity-Fed Distribution
Elevate your barrels 3-4 feet high to create natural water pressure for irrigation. This eliminates the need for electric pumps while providing sufficient pressure for soaker hoses or drip irrigation systems.
Understanding your garden’s water needs, much like mapping your garden microclimates, helps you size your system appropriately.
Maintenance and Seasonal Care
Proper maintenance keeps your rain catchment system functioning efficiently year-round. Regular care prevents problems and extends system life significantly.
Monthly Tasks:
- Check and clean inlet screens
- Inspect all connections for leaks
- Add mosquito dunks if needed
- Test spigot operation
Seasonal Maintenance:
Spring preparation involves thorough cleaning after winter storage. Remove any debris, check for damage, and ensure all connections are secure. Summer maintenance focuses on algae prevention and mosquito control.
Fall preparation includes cleaning gutters and downspouts to maximize collection efficiency. Winter care varies by climate – in freezing areas, drain and store barrels to prevent damage, while moderate climates may allow year-round operation with minimal precautions.
Just as we maintain our garden tools seasonally, consistent rain barrel maintenance ensures long-term reliability.
Calculating Your Collection Potential
Understanding your roof’s collection capacity helps you plan appropriately sized storage. A simple formula reveals your potential: for every inch of rainfall, a 1,000 square foot roof collects approximately 600 gallons of water.
Measure your roof area by multiplying length times width for each section that drains to your collection point. Most residential roofs can collect substantial amounts even from moderate rainfall events.
Consider your garden’s water needs when sizing your system. Vegetable gardens typically require 1-2 inches of water weekly, while established perennial beds need less frequent watering. Match your storage capacity to your irrigation needs and local rainfall patterns.
Troubleshooting Common Issues
Even well-designed systems occasionally need adjustments. Fortunately, most issues have straightforward solutions that don’t require professional help.
Low water pressure often results from insufficient elevation. Raise your barrels higher or clean clogged screens that restrict flow. Algae growth indicates too much light exposure – cover transparent barrels or move them to shadier locations.
Mosquito problems arise from standing water without proper treatment. Use biological controls like mosquito dunks, or ensure tight-fitting lids prevent access to breeding sites.
Overflow issues during heavy rains can damage foundations or flood garden areas. Verify your overflow routing directs water appropriately, and consider adding additional storage capacity.
Maximizing Your Garden’s Water Efficiency
Effective rain catchment works best when combined with water-wise gardening practices. Mulching reduces evaporation, while proper plant selection minimizes irrigation needs.
Group plants with similar water requirements together, creating irrigation zones that use collected rainwater efficiently. Deep, infrequent watering encourages strong root development and reduces overall water needs.
Consider drip irrigation or soaker hoses connected directly to your rain barrels. These efficient delivery methods minimize waste while providing consistent moisture levels that plants prefer.
Start Small, Think Big
Beginning with a single barrel system lets you learn the basics without overwhelming complexity. As your confidence grows, expansion becomes natural and straightforward.
Many successful gardeners start with basic collection and gradually add features like multiple barrels, automated overflow, or integrated irrigation systems. This progressive approach builds expertise while spreading costs over time.
Remember, every gallon you collect reduces your environmental impact while providing superior water for your plants. Your rain catchment system represents a meaningful step toward sustainable gardening that benefits both your garden and the broader environment.
With proper planning and basic materials, you’ll soon transform every rainfall into an opportunity to nurture your garden naturally and sustainably.